Currently it's uninhabited and empty with no one (except neighbours) to check on it.
I thus decided to build a security camera using a Raspberry Pi that I had lying around and buying some additional components.
The result was pretty cool. With an additional Rs. 1200 (around $35) and building mostly on open technologies, I was able to build a security system with motion detection and which also works in the dark. As soon as movement is detected in front of camera, a photo + small video is sent to my Android smartphone on the Telegram app (An app similar to WhatsApp). Although it's quite simple and many things can be improved, it does the job and is pretty cool.


Things you will need
1. Raspberry Pi + SD card (~$45, without casing)I would recommend you to buy from ModMyPi where the shipping to Mauritius is relatively low. This bundle comes with an 8GB micro SD card. In my case I've used the old version: Raspberry Pi 1 Model B which is around 4 times less powerful than a Raspberry Pi 2 but which still does the job well.

http://www.modmypi.com/raspberry-pi/rpi2-model-b/raspberry-pi-2-model-b-new-and-8gb-microsd-card-bundle/
You might also want a small casing to keep everything neat.
http://www.modmypi.com/raspberry-pi/cases/modmypi-single-colour/modmypi-modular-rpi-b-plus-case-clear
2. Pi NoIR camera (~$23)
This is the camera module that plugs into the Raspberry Pi board.
It's important to take the NoIR model since there is No InfraRed filter on the camera. The normal camera model contains an infrared filter and won't allow you to see in the dark. The camera normally works with both Raspberry Pi 1 and 2 models.

3. Infrared illuminator ($8 - illuminator + $6 - 12V adapter)
This is the thing that will allow the Pi camera to see in the dark.
Think of it as a lamp which is emitting light in the infrared spectrum instead of the visible spectrum.
You won't see anything with your naked eyes but the camera will.
I bought this one from eBay which also auto powers-on in the dark. You'll also need a 12V 1A AC to DC adapter with a 2.1mm jack (it's a standard size). I bought mine for Transcom, Rose Hill for around $6.

4. Ethernet cable or a WiFi / 3G dongle
To connect the Raspberry Pi to the internet, you have 3 options:
1) Via Ethernet - most reliable and easiest way
2) Via WiFi - less reliable and a bit more difficult to set up
http://www.modmypi.com/raspberry-pi/accessories/wifi-dongles/wifi-dongle-nano-usb
https://www.modmypi.com/blog/how-to-set-up-the-ralink-rt5370-wifi-dongle-on-raspian
3) Via a 3G dongle - very difficult / not recommended unless you have constraints like no internet connection on site. Be careful with the dongle you choose - not all of them are compatible with the RPi.
Connecting the camera to the Pi
Connecting the camera to the Pi is very easy. Just push on the sides of the slot, then pull upwards and afterwards insert the camera ribbon. You can follow this guide:Installing Raspbian on the SD Card
You now need to install Raspbian (a Debian-like linux distribution for the RPi) on the SD/MicroSD card.1. Download Raspbian from here: https://downloads.raspberrypi.org/raspbian_latest
2. Extract the ZIP file
3. Follow one of the guides below, depending on your OS, to write the .img file to the SD card:
Booting into Raspbian
It's now time to configure Raspbian.Connect your Raspberry Pi to a USB power source and to your screen via the HDMI port.
You'll also need to connect a keyboard via one of the USB ports.
It will boot up and you'll see a screen like this one:
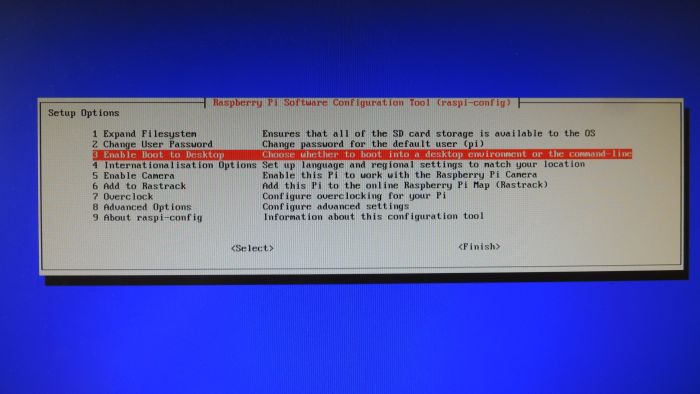
Select 1. Expand Filesystem, and when it's back to the menu, move down and enable the camera by selecting 5. Enable Camera
Now choose Finish and choose Yes when prompted to reboot.
That's it. If you ever need to change any configuration option, you can type sudo raspi-config at the terminal. Also, the default credentials to login on raspbian are:
Username: pi / Password: raspberry
Disabling the Pi NoIR camera LED
By default, the Pi NoIR has a bright red led when you're using it.If you want to disable the camera led, add the following at the bottom of /boot/config.txt and reboot:
disable_camera_led=1
Creating a Telegram bot
We're almost there! Now to an interesting part.
Have you heard of Telegram Messenger? If not, check out this link!
It's a really beautiful & fast app with tons of functionalities. I personally find it better than WhatsApp but it still has not caught up yet with WhatsApp's huge user base.
Anyway, Telegram provides you with a handful of APIs, one of which is the Bot API which we'll use here. It allows you to automatically send messages/photos/videos/... to your phones without any restriction! Think of all the things that could be done with the IoT (internet of things) wave that's coming!
Create a bot using the Botfather
In Telegram, a bot appears just like a normal contact. To create a bot for yourself, you need to use the Botfather who is also... a bot :)
1) To get started, install Telegram Messenger on your smartphone - it's available for Android, iOS, PC and Mac.
1) To get started, install Telegram Messenger on your smartphone - it's available for Android, iOS, PC and Mac.
2) Now, open your smartphone's web browser and navigate to https://telegram.me/botfather
3) Click on "Send Message" and choose "Telegram" to open the link. This will open up a conversation with the Botfather in Telegram.
4) Detailed bot creation instructions can be found here: https://core.telegram.org/bots#botfather
You can set a name, profile pic and description, etc. via various commands.
Below are basic guidelines to create the bot. Just type the /newbot command to get started. (Of course use your own bot names)
You: /newbot Botfather: Alright, a new bot. How are we going to call it? Please choose a name for your bot. You: My Bot Name Botfather: Good. Now let's choose a username for your bot. It must end in `bot`. Like this, for example: TetrisBot or tetris_bot. You: MyBotUsername_bot Botfather: Done! Congratulations on your new bot. You will find it at telegram.me/MyBotUsername_bot. You can now add a description, about section and profile picture for your bot, see /help for a list of commands. Use this token to access the HTTP API:110201543:AAHdqTcvCH1vGWJxfSeofSAs0K5PALDsawFor a description of the Bot API, see this page: https://core.telegram.org/bots/api
You can add a profile pic for the bot using /setuserpic and a description using /setdescription
Now, still in the Bot Father chat window, let's add some commands that we'll use in our scripts:
 You: /setcommands
 BotFather: Choose a bot to change the list of commands.
 You: [select your bot from the list]
 Botfather: OK. Send me a list of commands for your bot. Please use this format:
 command1 - Description
 command2 - Another description
 You: activate - Enable sending of photos and videos
 deactivate - Disable sending of photos and videos
 status - Check if the camera is online
 Botfather: Success! Command list updated. /help
To add the bot to your chat list, go to telegram.me/MyBotUsername_bot from your smartphone's browser. That's it! Keep a copy of the token highlighted in green and don't share it to anybody! This is your key to control the bot.
Installing python-telegram-bot
To send messages to our phone from the Pi, we need to communicate via the Telegram Bot API. Everything is documented here. You can communicate directly by sending GET/POST requests but to make things easier we'll use python-telegram-bot which is a python wrapper library around the Bot API. Let's install it!Update package lists:
sudo apt-get update
Install pip (a python package manager)
sudo apt-get install python-pip
Use pip to install python-telegram-bot
sudo pip install python-telegram-bot
Installing Motion on the Raspberry Pi (dependencies only)
Motion is a software motion detector for linux. It's a very powerful tool with many advanced features. Unfortunately, the Pi camera was not supported until some guy modified motion and added support for it.
I used this guide to install motion. Below are the steps - login to your Pi and run the following commands (you must be connected to internet):
Update package lists:
Install motion + its dependencies
Update package lists:
sudo apt-get update
Install motion + its dependencies
sudo apt-get install motion
Remove motion, but keeping dependencies installed.
sudo apt-get remove motion
Install libjpeg62
sudo apt-get install libjpeg62
At this point, motion is not yet installed, but it will be installed in the next section when we are deploying all our scripts to the Pi.
Deploying our custom scripts to the Raspberry Pi
Finally, we've reached the most important part where we'll deploy motion-mmal + the custom scripts we've developed. All files are hosted on github.
Now edit the file located at ./pitelegramcam/security/scripts/myconfig.py using your favorite text editor (e.g. nano):
Replace the green part with the bot token noted previously in Create a bot using the BotFather section (the single quotes are necessary).
Replace the blue part by your Telegram chat id (a unique number representing your account). To get it, send a message to your bot via Telegram e.g. "test 1234". Now from your Pi, run:
You should see something like that:
Your chat id is the text in blue.
Now let's move to next section and get start everything up!
To launch our security camera run the following:
You can add the above line (without sudo) at the bottom of the file /etc/rc.local to start everything automatically at startup.
Now, try to move in front of the camera and do funny things! You should receive a photo and small video within a few seconds!
From your bot you can also send the commands /activate, /deactivate and /status.
To stop the motion detection:
You can also tune the parameters in motion-mmalcam.conf for better results. The following lines might be of interest:
* Hook up a speaker which allows you to play a loud sound when sending a command. You could also use Telegram sound recording and play your own voice through the speaker to scare thieves off!
* Adding multiple cameras. A Pi supports only 1 Pi camera but you can try adding additional IP cameras and configure them in motion.
* Power backup using USB chargers.
Feel free to also post your ideas!
 sudo bash
 cd /home/pi/
 git clone https://github.com/shaan1337/pitelegramcam.git
 chmod +x pitelegramcam/security/*.sh
 chmod +x pitelegramcam/security/scripts/*.py
 chmod +x pitelegramcam/security/motion
Now edit the file located at ./pitelegramcam/security/scripts/myconfig.py using your favorite text editor (e.g. nano):
 #!/bin/python
 import os
 #Set your bot token here
 token = '123456789:ABCDe-11111111111111111111111111111'
 #Set the user or group chat id here
 chat_id = 123456789
 #cd to the script's directory
 abspath = os.path.abspath(__file__)
 dname = os.path.dirname(abspath)
 os.chdir(dname)
Replace the green part with the bot token noted previously in Create a bot using the BotFather section (the single quotes are necessary).
Replace the blue part by your Telegram chat id (a unique number representing your account). To get it, send a message to your bot via Telegram e.g. "test 1234". Now from your Pi, run:
curl https://api.telegram.org/bot123456789:ABCDe-11111111111111111111111111111/getUpdates
You should see something like that:
 {"ok":true,"result":[{"update_id":144808049,
 "message":{"message_id":697,"from":{"id":115803478,"first_name":"John","last_name":"Smith","username":"Ox1337"},"chat":{"id":115803478,"first_name":"John","last_name":"Smith","username":"Ox1337"},"date":1444064795,"text":"test 1234"}}]}
Your chat id is the text in blue.
Now let's move to next section and get start everything up!
Starting it up!
That's it! We're finally done.To launch our security camera run the following:
sudo /home/pi/pitelegramcam/security/start.sh
You can add the above line (without sudo) at the bottom of the file /etc/rc.local to start everything automatically at startup.
Now, try to move in front of the camera and do funny things! You should receive a photo and small video within a few seconds!
From your bot you can also send the commands /activate, /deactivate and /status.
To stop the motion detection:
sudo /home/pi/pitelegramcam/security/stop.sh
You can also tune the parameters in motion-mmalcam.conf for better results. The following lines might be of interest:
 # Maximum number of frames to be captured per second.
 # Valid range: 2-100. Default: 100 (almost no limit).
 framerate 4

 ############################################################
 # Image File Output
 ############################################################
 # Output 'normal' pictures when motion is detected (default: on)
 # Valid values: on, off, first, best, center
 # When set to 'first', only the first picture of an event is saved.
 # Picture with most motion of an event is saved when set to 'best'.
 # Picture with motion nearest center of picture is saved when set to 'center'.
 # Can be used as preview shot for the corresponding movie.
 output_pictures best

 ############################################################
 # OpenMax/MMAL camera support for Raspberry Pi
 ############################################################
 mmalcam_name vc.ril.camera
 mmalcam_control_params -fps 10
 # Ignore sudden massive light intensity changes given as a percentage of the picture
 # area that changed intensity. Valid range: 0 - 100 , default: 0 = disabled
 lightswitch 10

 # Specifies the number of pre-captured (buffered) pictures from before motion
 # was detected that will be output at motion detection.
 # Recommended range: 0 to 5 (default: 0)
 # Do not use large values! Large values will cause Motion to skip video frames and
 # cause unsmooth movies. To smooth movies use larger values of post_capture instead.
 pre_capture 2

 # Event Gap is the seconds of no motion detection that triggers the end of an event.
 # An event is defined as a series of motion images taken within a short timeframe.
 # Recommended value is 60 seconds (Default). The value -1 is allowed and disables
 # events causing all Motion to be written to one single movie file and no pre_capture.
 # If set to 0, motion is running in gapless mode. Movies don't have gaps anymore. An
 # event ends right after no more motion is detected and post_capture is over.
 event_gap 3
Going further
Our security camera is pretty sophisticated at this stage but there's so much more you can do! Below are some ideas:* Hook up a speaker which allows you to play a loud sound when sending a command. You could also use Telegram sound recording and play your own voice through the speaker to scare thieves off!
* Adding multiple cameras. A Pi supports only 1 Pi camera but you can try adding additional IP cameras and configure them in motion.
* Power backup using USB chargers.
Feel free to also post your ideas!
Awesome article! Very well written with links, etc Just gave me ideas for a baby monitor for my newborn! Keep it up!
ReplyDeletehahahaha interesting article! Nicely written, and as always, great technical recipes with interesting technological ingredients.
ReplyDeletetrop cool! :)
ReplyDeleteA cost-effective way to build your own kit. A equivalent kit would cost you 10k-20k. Future wife is happy :) You are saving money !!
ReplyDeleteThanks for the feedback guys! The baby monitor is a great idea :)
ReplyDeleteThere are so many possibilities.
As Logan mentioned, yes it's really costly! Check out this project from some guys who also integrated sensors and buzzers in a full alarm kit (available for sale) at a very low cost:
http://www.projects.privateeyepi.com/home/home-alarm-system-project
Nice!!! Need to try it! :)
ReplyDeleteReally nice post! Need to try as well :)
ReplyDeletei have some error: picture=sys.argv[1] list index out of range
ReplyDeletethe script don t send me picture
what is the problem?thanks
Hi!
ReplyDeleteIt seems that the script is being called without the picture filename as parameter.
You do NOT need to run the script send_pic.py manually.
motion should automatically execute the script with the file name as parameter.
In your motion-mmalcam.conf, this line should be present:
"on_picture_save python /home/pi/pitelegramcam/security/scripts/send_pic.py %f"
Unfortunately, there is no debug mode in the script currently.
To check if send_pic.py is being called, you can add following lines in send_pic.py just after def main(argv):
text_file = open("test.txt", "w")
text_file.write("test")
text_file.close()
If the file test.txt is created, then it's being properly called.
hi
ReplyDeleteI have a problem when the script start on boot
I have to stop work(stop.sh) to do and then start(start.sh)
then everything works
how can I do to fix
thanks
This comment has been removed by the author.
DeleteHi,
ReplyDeleteI'm trying this out but am stuck when it comes to getting the telegram chat id. I have followed instructions but after entering curl https//...etc it mentions something about Bad Gateway but no id number. Any suggestions? Thanks.
hi,
Deleteu may retry again.
curl https://api.telegram.org/bot"token number"/getUpdates
Dont forget to put /getUpdates
Excellent tips for a high quality webcam. Thanks for sharing!
ReplyDeleteIt was wondering if I could use this write-up on my other website, I will link it back to your website though.Great Thanks. Home Security Systems
ReplyDeleteI don’t suppose many of websites give this kind of information.
ReplyDeletebusiness IP cameras
This written piece gives fastidious understanding yet.
ReplyDeleteself storage camera system
When your website or blog goes live for the first time, it is exciting. That is until you realize no one but you and your. CCTV in Penrith
ReplyDeleteToday, I was just browsing along and came upon your blog. Just wanted to say good blog and this article helped me a lot, due to which I have found exactly I was looking. Hi Rise Camera
ReplyDeleteI’m going to read this. I’ll be sure to come back. thanks for sharing. and also This article gives the light in which we can observe the reality. this is very nice one and gives indepth information. thanks for this nice article... CCTV Security Installers
ReplyDeleteGreat survey, I'm sure you're getting a great response. Hikvision DS-2CD2385G1-I
ReplyDeleteThanks for this article is very informative and helpful For Home security and Home improvement
ReplyDeleteThese was the best advice and opinions given ever.. Thank you..
ReplyDeletehttps://filmeshot.com/videography/wedding/best-wedding-videographers-in-yehlanka/